Uncategorized March 7, 2024

Understand What Upgrades Are Important For Home Sales

Selling your house demands more than just putting up a “For Sale” sign. Home improvements are pivotal in attracting buyers and securing a favorable deal. If you’re thinking about a spring home sale, you’ll want to know the valuable upgrades to make.

Before listing your property, understanding the types of enhancements that add value and appeal to your home is crucial. I will guide you through essential home improvements, from curb appeal to interior updates. You’ll also learn how to maximize your return on investment.

By tailoring your upgrades to meet market preferences and adhering to a strategic budget, you can ensure your house stands out in the competitive real estate market.

Whether you’re tackling DIY projects or hiring professionals, the right improvements can significantly affect your home’s sale price and time on the market.

From thirty-eight years of selling homes there are specific projects that will make a significant difference. There are also many that will not. They key is understanding where to spend your money.

Let’s examine what you should know as a potential home seller.

Understanding Your Local Target Market

Identifying your potential buyers is the first step in tailoring your home for sale. Different markets have unique preferences. Recognizing these can guide your improvement decisions.

If you’re targeting families, focus on creating functional, safe spaces and possibly enhancing outdoor areas for children. Modern, low-maintenance upgrades and smart home features might appeal to young professionals.

Research local market trends to understand what sells. Online real estate listings and feedback from local agents provide valuable insights into buyer preferences in your area. This knowledge lets you decide which improvements resonate most with your target audience.

Consider the community’s character when planning your upgrades. A luxury remodel might not return its investment in a modest neighborhood, just as minimal improvements might undervalue your home in an upscale area.

Aligning your home’s features with buyer expectations in your market is crucial for a successful sale. By making intelligent decisions on upgrades, your house will enter pending status in a short amount of time.

What Are Examples of Essential Improvements?

When preparing to sell your house, focusing on certain key areas can significantly enhance its appeal and value. Here’s a breakdown of essential home improvements to consider:

Curb Appeal Enhancements

First impressions matter. Enhancing your home’s curb appeal can make a lasting impression on potential buyers.

Simple updates like refreshing the exterior paint, maintaining the landscaping, and replacing the front door can dramatically improve your home’s exterior attractiveness.

Small touches, like new house numbers or a welcoming doormat, contribute to a positive initial perception.

Interior Updates

Fresh paint in neutral colors inside the house can transform spaces, making them appear brighter and more spacious.

Replacing worn or outdated flooring enhances your home’s overall look and feel while updating light fixtures and hardware (like doorknobs and cabinet pulls), which can modernize spaces without a significant investment.

Kitchen and Bathroom Remodels

Kitchens and bathrooms are pivotal in a buyer’s decision-making process. You don’t need to complete renovations. Minor updates can have a significant impact.

To refresh these spaces, consider replacing old appliances with more energy-efficient models, updating countertops, and refinishing cabinets. Re-grouting tile, updating fixtures, and ensuring adequate lighting can significantly improve the appearance of bathrooms.

Each of these improvements adds to your home’s aesthetic appeal and functionality, making it more attractive to potential buyers.

When selecting projects, consider the current trends in home design. Ensure you aim for timeless rather than trendy choices to appeal to a broader audience.

Cost-Effective Strategies

Maximizing the return on investment (ROI) for home improvements requires strategic planning and budgeting. Here are ways to enhance your home’s value without overspending:

DIY Projects vs. Professional Hiring

Evaluate which projects you can do yourself and which require professional expertise. Simple tasks like painting, minor landscaping, and hardware updates can be cost-effective DIY projects.

However, hiring professionals ensures safety and quality for electrical work, plumbing, or significant renovations. Doing so potentially saves money in the long run by avoiding costly mistakes.

Budgeting for Maximum ROI

Prioritize improvements with the highest return on investment. Minor kitchen and bathroom updates can yield significant returns without requiring complete overhauls.

Allocate your budget based on the potential impact on your home’s sale price. Always include a contingency fund for unexpected expenses to avoid overspending.

Shopping around for materials and services can also lead to significant savings. Look for sales and clearance items, and compare quotes from multiple contractors to get the best deal without compromising quality.

Invest in improvements that appeal to the broadest audience. Neutral color schemes and high-quality fixtures in classic styles tend to attract more buyers than personalized or trendy choices.

Adopting a strategic approach to home improvements, focusing on projects with the highest ROI, and carefully managing your budget can enhance your home’s appeal to potential buyers without exhausting your resources.

Making intelligent, low-price, cost-effective upgrades maximizes your investment and increases your home’s marketability.

Avoiding Over-Improvements

When enhancing your home for sale, it’s crucial to balance making valuable updates and avoiding over-improvements that don’t yield a proportionate return on investment.

Here’s how to ensure your upgrades are well-aligned with your home’s market and neighborhood:

Understanding the Neighborhood Standard

Research homes in your area to understand what features and improvements are standard. Over-improving—like installing high-end appliances in a modest neighborhood—may not attract a higher sale price, as buyers shopping in your area may not expect or value such upgrades.

Aim to bring your home up to a competitive standard but not far beyond.

Calculating Potential Return on Investment

Before embarking on any significant improvement, evaluate its potential ROI. Some projects may improve your home’s appeal but won’t necessarily increase its value enough to recoup the investment.

Focus on updates known to appeal to buyers in your market, such as functional improvements or aesthetic enhancements.

Strategic updates should enhance your home’s best features and fix functional flaws. For example, ensuring your home’s heating, ventilation, and air conditioning (HVAC) system works efficiently can be more beneficial than luxury upgrades in the eyes of potential buyers.

Cincinnati Realtor Paul Sian told me that new HVAC systems are well-received in his market.

“Bill, potential home buyers love when a home has a significant upgrade like a new heating system or AC. It one an expense buyers can cross off their list and not have to worry about for a very long time.

Buyers are willing to pay for upgrades that have such a lasting impact on their property, especially when it comes to energy bills.”

Lastly, consider consulting with a real estate agent familiar with your neighborhood. They can offer valuable insights into which improvements are worthwhile and which could potentially overprice your home for the area.

By carefully selecting improvements that align with your neighborhood’s expectations and potential buyers’ preferences, you can avoid the pitfalls of over-improvement. This strategic approach ensures your investments enhance your home’s value and appeal without exceeding the ceiling price for your area.

Navigating Legal and Safety Requirements

Ensuring your home improvements comply with local building codes and safety regulations is crucial before selling your house. Here’s how to navigate these requirements effectively:

Permits and Inspections

Obtaining the necessary permits is essential for significant renovations. You must have permits when you add a room, alter structures, or do major electrical and plumbing work.

These permits ensure the work meets local safety and zoning standards, assuring potential buyers about the legality and quality of the improvements.

Always check with your local building department to understand which projects require permits and the process for obtaining them. I know from experience how homeowners can put themselves in a terrible position when they don’t take necessary action.

When it comes time to sell, the buyer or agent will research whether permits have been pulled. You’ll spend more legalizing this situation than doing what’s right out of the gate.

Addressing Safety Issues

Prioritize improvements that address any existing safety concerns. This includes fixing electrical issues, ensuring smoke and carbon monoxide detectors are functional, and addressing structural problems.

Making these improvements not only helps pass home inspections but also boosts buyers’ confidence in the safety and integrity of the home. Many buyers will have home inspection checklists that they follow. Removing concerns is always wise.

Compliance with legal and safety standards protects you from potential liability and increases the appeal of your home to prospective buyers.

Demonstrating that your home has been well-maintained and meets current safety regulations can make it more attractive in the competitive real estate market.

Staging Your Home for Sale

Staging your home effectively can significantly affect how quickly it sells and for how much. Here are tips to showcase your home in its best light:

Declutter and Depersonalize

Start by removing personal items, such as family photos and keepsakes. This helps potential buyers envision themselves living in the space. Decluttering also makes rooms appear larger and more inviting.

Enhance Lighting

Good lighting enhances the mood of your home. Open curtains to let in natural light, and add lamps to brighten darker areas. Well-lit rooms appear more welcoming and spacious.

Arrange Furniture Strategically

Position furniture to showcase the flow of your home. Removing excess furniture can help spaces feel more spacious. Arrange seating areas to foster conversations and highlight the functionality of each room.

Neutralize the Decor

Neutral colors for walls, carpets, and furniture appeal to a broader audience. They create a blank canvas, allowing buyers to imagine personalizing the space.

Highlight Key Features

Accentuate your home’s best features, whether a fireplace, a large window with a view, or built-in shelving. Make sure these features are clean, repaired, and prominently displayed.

Staging doesn’t require a large budget; small changes can significantly impact. The goal is to create an environment where potential buyers can easily picture themselves living and thriving.

Conclusion

Home improvements before selling can significantly influence your home’s appeal and price. You can enhance your home’s value by understanding your target market, focusing on essential updates, and implementing cost-effective strategies.

Avoid over-improvements, comply with legal and safety standards, and stage your home to attract potential buyers.

With thoughtful planning and strategic improvements, you can ensure your home stands out in the competitive real estate market, maximizing your return on investment and facilitating a quicker sale.

You won’t need to pray to get your home sold, as there will be plenty of buyers who will be attracted to your property. If I can answer any questions, please contact me anytime. I would love to answer questions or provide any assistance you may need. Best of luck!The post Understand What Upgrades Are Important For Home Sales appeared first on RealtyBizNews: Real Estate Marketing & Beyond. | BidBuddy.com

http://dlvr.it/T3lvmH

Uncategorized March 7, 2024

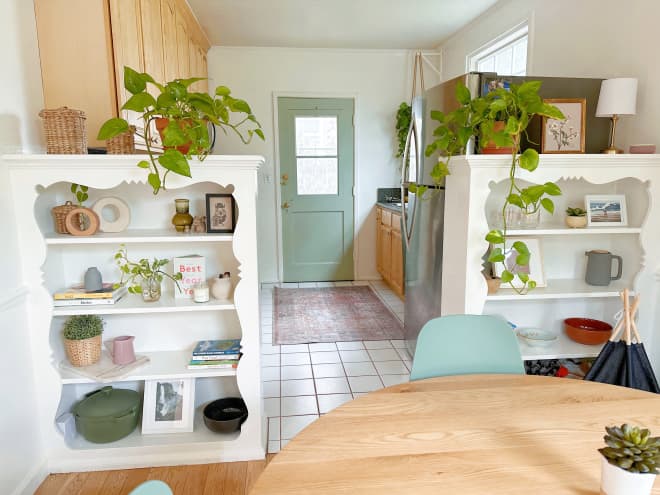
This LA Rental Apartment Has a Sunny, Plant-Filled Breakfast Nook

Uncategorized March 7, 2024

Pimco’s Sonali Pier lets her ‘cautious contrarianism’ speak for itself: The bets she’s making now

Uncategorized March 7, 2024

Remodeling Wisdom: 10 Budget Backsplash Hacks

When the kitchen remodeling budget is tight: 10 ideas for finessing the backsplash issue.

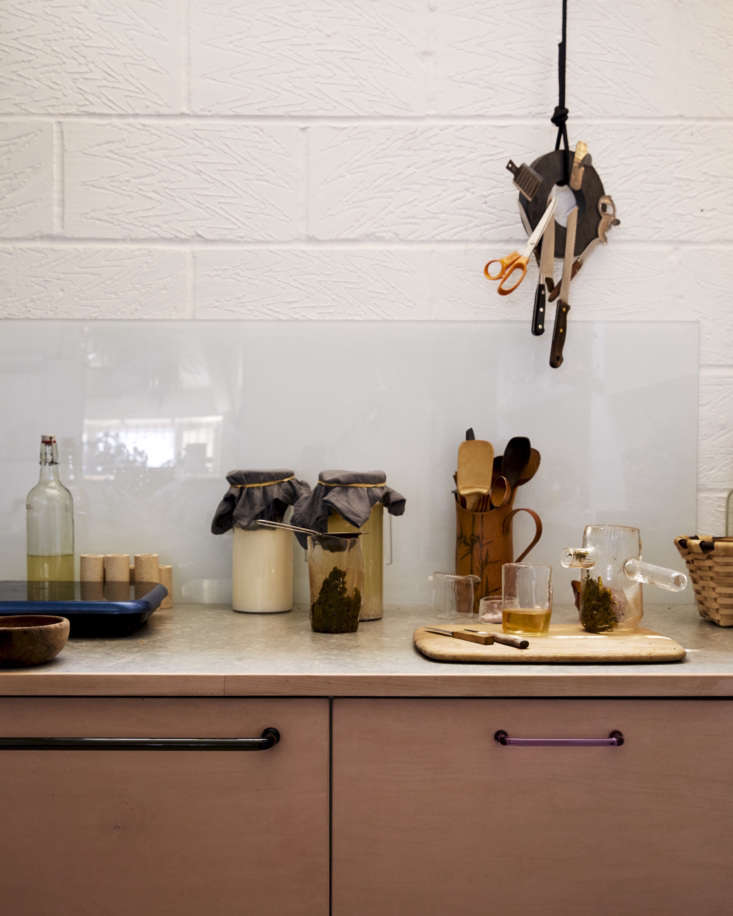
1. Glass

Above: An artist’s studio kitchen is full of creative and inexpensive remodeling ideas: The backsplash is a sheet of painted glass, salvaged from an old project and glued in place. A round industrial magnet serves as a utensil holder. Photograph by Kim Lightbody, from Kitchen of the Week: A Glassmaker’s Imaginative Studio Kitchen in London, DIY Ikea Hacks Included.

2. Chalkboard Paint

Above: Designer C.S. Valentin’s apartment features a kitchen backsplash fashioned from slabs of wood painted with chalkboard paint. Photograph by Jonathan Hökklo, from At Home with C. S. Valentin: French Eclecticism in Cobble Hill, Brooklyn.

3. Painted Plywood

Above: Norwegian blogger Nina Holst of Stylizmo created a backsplash using birch plywood stained black. Photograph by Nina Holst for Stylizimo, from Kitchen Upgrade: The Low-Cost DIY Backsplash.

4. Selective Tiling

Above: A trend we’re seeing everywhere lately: Instead of tiling the entire wall above the kitchen counter, consider the cost-effective strategy of using tiles just where you most need them: above the sink and stove. Photograph by Ruby Woodhouse, from A Vintage-Inspired Apartment in Hackney from Abel Sloane and Ruby Woodhouse of 1934. (See more examples in DIY Idea: Tiny Tiled Backsplashes That Pack a Punch.)

5. Marble Scrap

Above: In Fabr Studio’s office kitchen, a slab of marble, left over from a kitchen project, serves as oversized backsplash. Photograph by Matthew Williams for Remodelista, from Kitchen of the Week: An Architecture Firm’s Own DIY Kitchen in Williamsburg, Ikea Hacks Included.

6. Metal Sheet

Above: At Riverside House: A Normandy Guesthouse from an Upstart American Restaurateur, a brass sheet—sourced from the longstanding Paris metal store Tartaix—serves as backsplash. Photograph courtesy of Riverside House. (See also: Trend Alert: Metallic Sheets in the Kitchen.)
Above: And brass sheet as backsplash, as seen in The Catskills Farmhouse of Two Brooklyn Creatives, Weekend DIY Edition. Photograph by April Valencia, courtesy of Rip & Tan.

7. Stick-Up Tiles

Above: Canadian company Smart Tiles offers peel-and-stick embossed Gel-O tile look-alikes; shown is the Hexago pattern. Photograph via Atelier de Curiosite.

8. Colorblocking

Above: Color-blocking the wall can create the illusion of a backsplash. Photograph courtesy of British Standard, from Kitchen of the Week: Stardust in Northwest London.
Above: Another example of paint-as-backsplash, from A Kitchen for the People, Courtesy of Prince Charles.

9. Beadboard

Above: Abbey Hendrickson of Aesthetic Outburst installed a DIY beadboard backsplash over the old yellow linoleum and contact paper. “We picked up two sheets of cheapo beadboard paneling from our local hardware store, nailed it horizontally, caulked it, painted it, and voilà. A solution in less than two hours and for less than $60.” Photograph by Abbey Hendrickson, from Kitchen of the Week: A DIY Kitchen Overhaul for Under $500.

10. Waterproof Wallpaper

Above: Kitchen Walls, a company out of the Netherlands, has developed a heat- and stain-resistant wallpaper that can be applied to almost any surface, creating an instant kitchen backsplash. Made of PVC, the wallpaper is impermeable to water, “so it’s usable behind your stove. It can be cleaned with warm water and even the most terrible stains, such as grease or tomato sauce, will disappear without effort.” The Designers Collection by Kirath Ghundoo; €145 ($159) a roll. See more at The Instant Backsplash: Stain-Resistant Wallpaper from the Netherlands.

N.B. This post is a favorite from our archives; the original story ran on June 27, 2019 and has been updated with new ideas and images.

For more budget remodeling ideas, see:

* Kitchen of the Week: Seattle Cookbook Author Aran Goyoaga’s Under-Budget Kitchen Remodel

* Sink Skirt Revival: 16 Fresh Examples of a New Old Trend

* Expert Advice: 23 Genius, Reversible, Budget-Friendly Hacks to Transform a Rental Apartment | BidBuddy.com

http://dlvr.it/T3kt9t

Uncategorized March 7, 2024

Kitchen of the Week: Stylist Brittany Albert’s Cosmetic Kitchen Upgrade, Trade Secrets Included

Brittany Alberts’s lament is a familiar one: “If budget hadn’t been a consideration, we would have loved to expand the footprint of our kitchen. And we would have loved to put in new cabinets and appliances. Instead, we had to stick with—and enhance what—was already in place.”

The wrinkle? Brittany is a stylist who works with interior designers and home design brands, so she approached her own home with a ready arsenal of accessories and tricks.

The narrow kitchen in question—an L-shaped galley probably last updated in the 1990s (scroll to the end for a Before shot)—was built as an addition to an 1880 farmhouse in Litchfield County, Connecticut, that Brittany and her husband, Sanders Witkow, a lawyer, bought as a retreat from their base in Brooklyn.

Taking a cosmetic tack made sense: the couple had a whole house to pull together and the existing kitchen, if not exactly to their taste, was in good working order. Come see how an interior stylist makes do—and where she ponies up.

Photography by Kate S. Jordan (@katesjordan), courtesy of Brittany Albert (@britt_albert). See disclaimer at end.

After

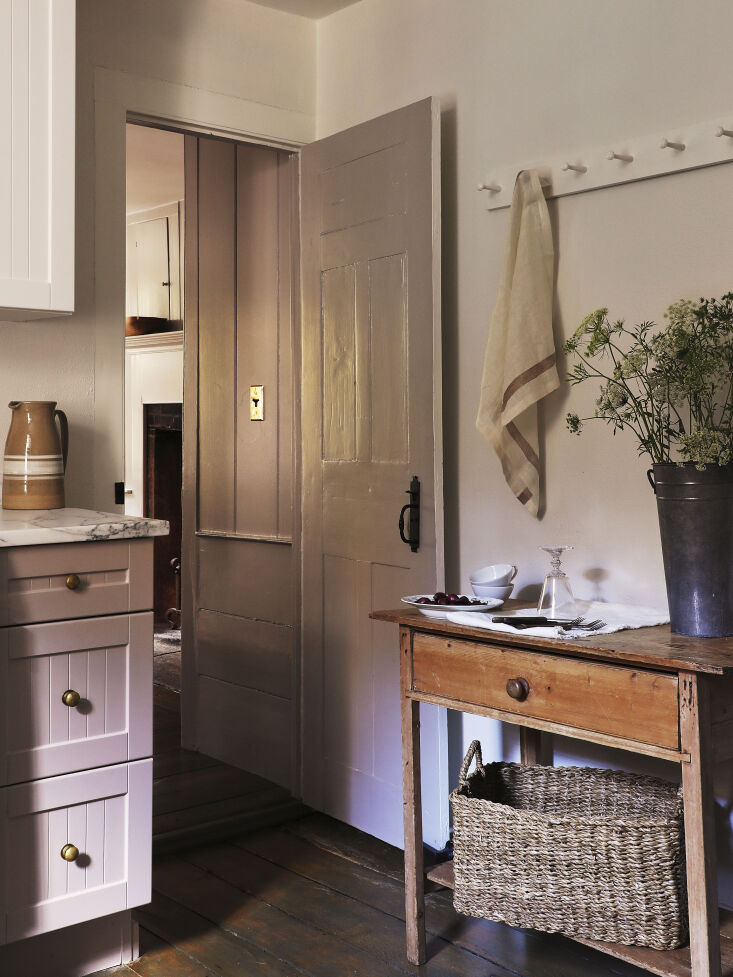
Above: The kitchen is situated just off the living room, which has its original hearth and beehive oven, and is likely where the kitchen was originally situated. As a link between the old and new—and an extra work surface—Brittany introduced an antique pine table from Plain Goods in New Preston, Connecticut, and hung a catchall Shaker peg rail over it.

For peg rail inspiration, go to our posts Instant Order and 16 Design Ideas to Steal from the Shakers.
Above: Brittany simply painted the cabinets and kept the existing dishwasher and other appliances. But she splurged by replacing the sink with a Shaws fireclay basin and deVol bridge faucet; read about the one she chose in our post Found: The Perfected Aged Brass Kitchen Faucet. Equally significantly, she swapped out the red granite counter.

How was she able to swing the new Calacatta Gold marble counter? “We found a slab at a local stone yard that had been sitting for months—it had been reserved by another customer but never purchased—and they gave us a big discount. Still, it was probably our biggest expense.”
Above: “I was tempted to take out the upper cabinets and have open shelving,” Brittany tells us, “but we were wary of hidden costs: when you rip out something. you don’t knowing what you’ll find behind it.” Instead, she painted the upper bank Benjamin Moore White Dove “to bounce more light around.” Not wanting a chilly, all-white kitchen, she used Farrow and Ball’s Elephant’s Breath on the lower cabinets: “I chose this light taupe for bit of contrast and interest—and because it works so nicely with the palette in the rest of the house.”

The light over the sink is deVol’s Small PlainSkullcap Porcelain Light; $290.
Above: Another easy upgrade: Brittany replaced the existing cabinet hardware with A57 Plain Knobs from Optimum Brasses in the UK: “I couldn’t find any sources here that had that same nice patina and handmade quality. It was a very easy process and they didn’t take long to come.” Unlacquered brass, she notes, “brings warm light to the room.”
Above: The existing range and microwave stayed in place. So did the lovely but damaged wooden floor: a natural fiber mat, the Ralph Lauren Carena Weave Solid Jute Rug from Overstock, covers a problem area and “brings in some really nice texture.”
Above: The work table is next to the fridge (not shown), which is tucked into an existing cabinet.
Above: The stylist at home: Brittany’s restrained touch is a reminder that a tight space calls for simplicity.
Above: There’s a pantry in the hall right off the kitchen: it leads to the dining area in a large converted barn. Note the Lewis Double Switchplate, $25, from Rejuvenation—Brittany replaced all of the white plastic switch covers with brass updates, a tiny detail that makes a difference.
Above: The pantry doors are also painted Farrow & Ball’s Elephant’s Breath.

Before

Above: The kitchen was painted a pale gray and had a red granite counter, cabinet knobs in a satin silver finish, and recessed ceiling lights.

Thinking of a cosmetic upgrade in your own kitchen? Take a look at:

* How to Paint Kitchen Cabinets: 5 Tips from a Master Painter

* 10 Paint Colors with Cult Followings: Architects’ All-Time Favorite Paint Picks—Benjamin Moore’s White Dove, included

* 13 Favorite Cost-Conscious Kitchen Remodels from the Remodelista Archives

N.B.: This post is a favorite from our archives; the original ran on February 9, 2023, and has been updated. The photographs in this post are licensed for Remodelista’s use and cannot be repurposed or used on any other website without the photographer’s permission. | BidBuddy.com

http://dlvr.it/T3kcks

Uncategorized March 6, 2024

How to Use a Circular Saw

Uncategorized March 6, 2024

This 1959’s Remodel Has the Most Gorgeous Indoor/Outdoor Vibes

Uncategorized March 6, 2024

Inspection vs. Appraisal: How Do They Compare?

When you’re buying a home, you’ll need two types of inspections—one is the actual inspection, and the other is the appraisal. They seem similar at first glance because both, as you might guess, involve a walkthrough of the property. They have different purposes, however. The information obtained is also reported to different parties.

{loadmoduleid 306}

What is a Home Inspection?

An inspection is thorough and is done by a professional, qualified home inspector. The inspector will look at the safety elements of a home and the integrity of the structure.

The systems and structural elements an inspector looks at include the plumbing, electrical, and HVAC systems, roofing, and siding.

A home inspection takes a few hours. Then, when it’s done, the inspector reports to the buyer.

If you’re the buyer, you can use the inspection information to decide whether or not buying the home is a suitable investment for you.

When you sign a contract with a seller, one of the first things you’ll do is schedule an inspection. If you’re in a competitive market, you might hire an inspector before you make an offer.

It’s up to you to choose a good, reputable inspector.

A buyer and their agent can attend an inspection, and it’s worth the time and money to make sure the property you want to buy doesn’t have any major, potentially expensive issues you should know about.

Sometimes, you might waive the inspection contingency, so you have a stronger offer, but you’re taking a risk in doing so.

Most states require sellers to disclose issues in a home when they’re selling it, but there’s no guarantee there isn’t a lurking issue that the seller simply isn’t aware of.

What is an Appraisal?

An appraisal is something almost all lenders are going to require you to have to get a mortgage. The appraisal’s purpose is to determine the estimated market value of a home. A third-party appraiser makes this determination based on factors like the home’s location, the value of properties that are similar and recently sold in the area, and the condition of the house.

The appraisal process will include a walkthrough, but it’s not as in-depth as an inspection. Then, the appraiser will research the comparables in the area and create a report.

The report will highlight the appraiser’s determination of the market value of the home. The lender will then use the appraisal report when they decide to approve a loan amount.

A lender can’t finance more than 97% of the home’s appraised value in most cases. If there’s an appraisal that comes back lower than the price you offer, then you have to pay the difference out of pocket, renegotiate, or leave the deal.

If the appraisal comes back and it’s higher than your offer price, you already have more equity in your home.

How Do the Two Compare?

The following are some specific differences between an inspection and appraisal:

• A home appraisal is something required by your lender if you’re buying a home, but a home inspection isn’t needed.
• Your lender orders an appraisal. If you want an inspection, you arrange this yourself.
• An inspection doesn’t affect your ability to get the loan amount you need, but an appraisal can.
• Appraisers only look at the surface features of a home, but an inspector looks for deeper issues.
• During an inspection, you’re encouraged to walk with the inspector, but an appraiser usually goes through the process without anyone present.
• During an inspection, if you’re there, the inspector will explain things to you as you go along. With an appraisal, you don’t know anything until the report is complete.
• Inspections only consider the property’s condition during the assessment, but an appraisal looks at local factors like crime rates in the area, lot size, and comparable home prices.

Overall, while there are differences, both an inspection and an appraisal are beneficial to a homeowner because they help you get the peace of mind of knowing that your home is worth what you’re going to pay for it and that it’s a safe place for you to live.

Also, both are completed by a third party, so you can feel more secure in your overall decision to buy a home. | BidBuddy.com

http://dlvr.it/T3hxCL

Uncategorized March 6, 2024

How to Become a Millionaire Through Real Estate (Start from ZERO)

Uncategorized March 6, 2024

Argyle sees path to profitability with $30M Series C raise